Appearance
QuestパススルーAPI
Camera2 の概要 | Android media | Android Developers
Meta QuestのパススルーAPIを触ってみる|oshimu
QuestパススルーAPI:
基本的にはAndroid Camera2 APIをQuestで使用しやすいようにしたものでQuestに合わせ機能がkいくつかついかされている。
- 基本レイヤ: Android Camera2 API
- Quest 独自部分:
- 左右それぞれのパススルーカメラを識別するためのベンダータグ (
com.meta.extra_metadata.positionなど) PassthroughCameraUtilsやPassthroughCameraPermissions等、Quest が提供するユーティリティ/ヘルパークラス- 専用のパーミッション (
horizonos.permission.HEADSET_CAMERA)
- 左右それぞれのパススルーカメラを識別するためのベンダータグ (
- Unity レイヤ:
WebCamTextureやWebCamTexture.devices経由で Android Camera2 のデバイスIDを参照し、Quest 特有のカメラを選択する
サンプルがあったのでまずはそちらを試してみる。
PassthroughCameraApiSamples
実装されていたモードは5つ
1.VameraViewer
視界の中心にカメラがどのような画像をとらえているか、表示されるモード。 使用しているカメラは左のものだった。
2.CameraToWorld
先ほどのカメラの機能に加え、「A」「B」を押すとその瞬間のカメラの画像・位置を残すことができる。
https://note.com/oshimu/n/n894d9d74fd29より
3.BrightnessEstimation
明るさの推定をおこなうもの。カメラを隠すことで暗くすると画面中央にある文字にエフェクトがかかる。
4.MultiObjectDectection
視界内(実際は左のカメラに映った)にあるものがなにがあるかAIを用いて測定するもの。
認識するもの一覧
5.ShaderSample
シーン内のメッシュがリアルタイムのカメラ映像を表示する
使用するカメラの設定方法:
サンプルアプリ内では、WebCamTextureManagerがあるためそこでLeft・Rightを入れ替える。

スクリプト内では、
[SerializeField] public PassthroughCameraEye Eye = PassthroughCameraEye.Right;
で設定可能。
開発の難易度について
確認中。出回っている情報が少なすぎる。
実際に開発してみる
サンプルアプリのManifestやコード・公式の概要や上記の記事2つをChatGPTに投げて、それらをもとに1から作成できるか試してみる。
作製1
(何度かエラーを出していたので何度か作り直しています。修正をかけたが、ここが限界かも。)
コード1(試作)
csharp
using System.Collections.Generic;
using TMPro;
using UnityEngine;
using UnityEngine.Android;

/// <summary>
/// Demonstrates camera acquisition (left/right) on Quest, using a Plane + 3D TextMeshPro.
/// Press A to switch to left camera, B to switch to right camera.
/// </summary>
public class PassthroughCamera : MonoBehaviour
{
    [Header("Plane (MeshRenderer) to display the camera feed")]
    public MeshRenderer planeRenderer;

    [Header("3D TextMeshPro for logs")]
    public TextMeshPro logText;

    [Header("Preferred resolution (e.g. 1280x960)")]
    public int camWidth = 1280;
    public int camHeight = 960;

    private WebCamTexture _webCam;
    private WebCamDevice[] _devices;

    // We'll store which index we assume is "left" or "right"
    private int _leftCamIndex = -1;
    private int _rightCamIndex = -1;

    // Simple log buffer
    private List<string> _logs = new List<string>();
    private const int MaxLogLines = 10;

    void Start()
    {
        AddLog("== PassthroughCamera Start ==");

        // Check references
        if (planeRenderer == null)
        {
            AddLog("Plane is not assigned.");
            return;
        }
        if (logText == null)
        {
            Debug.LogWarning("No 3D TextMeshPro assigned. Logs won't appear in 3D text.");
        }

        // Scale plane to (6.4 x 4.8) as an example
        planeRenderer.transform.localScale = new Vector3(0.64f, 1f, 0.48f);
        AddLog("Scaled plane to 6.4 x 4.8.");

        // Request android.permission.CAMERA if not granted
#if UNITY_ANDROID && !UNITY_EDITOR
        if (!Permission.HasUserAuthorizedPermission(Permission.Camera))
        {
            AddLog("Requesting CAMERA permission...");
            Permission.RequestUserPermission(Permission.Camera);
        }
        else
        {
            AddLog("CAMERA permission already granted.");
        }
#endif

        // Enumerate WebCam devices
        _devices = WebCamTexture.devices;
        AddLog($"Found {_devices.Length} camera device(s).");

        if (_devices.Length == 0)
        {
            AddLog("No camera device. Cannot display feed.");
            return;
        }

        // Try to map index 0 => left, 1 => right
        if (_devices.Length >= 1) _leftCamIndex = 0;
        if (_devices.Length >= 2) _rightCamIndex = 1;

        // Start by using "right" camera if we have it, else "left"
        var defaultIndex = _rightCamIndex >= 0 ? _rightCamIndex : _leftCamIndex;
        if (defaultIndex < 0)
        {
            AddLog("No suitable camera for default. Stopping.");
            return;
        }

        // Switch to default camera
        SwitchCamera(defaultIndex);
    }

    void Update()
    {
        // Press A => switch to left camera
        if (OVRInput.GetDown(OVRInput.Button.One) && _leftCamIndex >= 0)
        {
            SwitchCamera(_leftCamIndex);
            AddLog("Switched to LEFT camera.");
        }
        // Press B => switch to right camera
        else if (OVRInput.GetDown(OVRInput.Button.Two) && _rightCamIndex >= 0)
        {
            SwitchCamera(_rightCamIndex);
            AddLog("Switched to RIGHT camera.");
        }
    }

    private void SwitchCamera(int deviceIndex)
    {
        // Stop old if needed
        if (_webCam != null && _webCam.isPlaying)
        {
            _webCam.Stop();
        }

        // Create new WebCamTexture with desired resolution
        var deviceName = _devices[deviceIndex].name;
        AddLog($"SwitchCamera to deviceIndex={deviceIndex}, name={deviceName}");

        _webCam = new WebCamTexture(deviceName, camWidth, camHeight);
        planeRenderer.material.mainTexture = _webCam;

        try
        {
            _webCam.Play();
            AddLog("Camera started.");
        }
        catch (System.Exception ex)
        {
            AddLog($"Camera start error: {ex.Message}");
        }
    }

    void OnDestroy()
    {
        if (_webCam != null && _webCam.isPlaying)
        {
            _webCam.Stop();
            AddLog("Camera stopped.");
        }
    }

    /// <summary>
    /// Utility for adding short lines of log to 3D TextMeshPro
    /// </summary>
    private void AddLog(string message)
    {
        _logs.Add(message);
        if (_logs.Count > MaxLogLines)
        {
            _logs.RemoveAt(0);
        }

        if (logText != null)
        {
            logText.text = string.Join("\n", _logs);
        }

        Debug.Log(message);
    }
}
csharp
<?xml version="1.0" encoding="utf-8"?>
<manifest
    xmlns:android="http://schemas.android.com/apk/res/android"
    xmlns:tools="http://schemas.android.com/tools"
    android:installLocation="auto">

	<application
        android:label="@string/app_name"
        android:icon="@mipmap/app_icon"
        android:allowBackup="false">

		<!-- ★★★ 修正ポイント ★★★
             「@style/Theme.AppCompat.DayNight.NoActionBar」 →
             「@android:style/Theme.NoTitleBar.Fullscreen」 等に変更 -->
		<activity
            android:theme="@android:style/Theme.NoTitleBar.Fullscreen"
            android:name="com.unity3d.player.UnityPlayerActivity"
            android:exported="true">

			<intent-filter>
				<action android:name="android.intent.action.MAIN" />
				<category android:name="android.intent.category.LAUNCHER" />
				<category android:name="com.oculus.intent.category.VR" />
			</intent-filter>

			<meta-data android:name="unityplayer.UnityActivity" android:value="true" />
			<meta-data android:name="com.oculus.vr.focusaware" android:value="true" />
		</activity>

		<meta-data android:name="com.oculus.ossplash.background" android:value="passthrough-contextual" />
		<meta-data android:name="com.oculus.telemetry.project_guid" android:value="e2b65b13-e27a-4e26-90c9-3f270a1a6aac" />
		<meta-data android:name="com.oculus.supportedDevices"
                   android:value="quest3|quest3s"
                   tools:replace="android:value" />
	</application>

	<uses-feature
        android:name="android.hardware.vr.headtracking"
        android:version="1"
        android:required="true" />

	<uses-feature android:name="com.oculus.feature.PASSTHROUGH" android:required="true" />

	<uses-permission android:name="horizonos.permission.HEADSET_CAMERA" />
	<uses-permission android:name="com.oculus.permission.USE_ANCHOR_API" />
	<uses-permission android:name="com.oculus.permission.USE_SCENE" />
</manifest>
LogをQuest3でも確認できるようにシーン内にTMPを配置し、そこで見えるようにしています。 Logによるとcameraが見つかっていない模様。このこととエラー内容を伝えて修正をお願いするもなおらず…
作製2(正常動作)
作製コード(マニフェスト含め3つ)
メインプログラム
csharp
using UnityEngine;
using UnityEngine.UI;

public class SimpleCameraViewer : MonoBehaviour
{
    [SerializeField] private RawImage displayRawImage;
    private WebCamTexture webCamTexture;

    void Start()
    {
        // カメラ映像を開始
        StartCamera();
    }

    private void StartCamera()
    {
        // 利用可能なカメラの一覧を取得
        WebCamDevice[] devices = WebCamTexture.devices;
        if (devices.Length > 0)
        {
            // Quest 3 の場合、
            // [0]のとき左カメラを使用、[1]のとき右カメラを使用
            string cameraName = devices[0].name;

            // 解像度は 1280x960(最大)を推奨, FPS=30
            webCamTexture = new WebCamTexture(cameraName, 1280, 960, 30);

            // RawImage の texture に WebCamTexture をセット
            displayRawImage.texture = webCamTexture;

            // カメラスタート
            webCamTexture.Play();
        }
        else
        {
            Debug.LogError("No camera devices found on this headset!");
        }
    }

    private void OnDestroy()
    {
        // 終了時にカメラを止める
        webCamTexture?.Stop();
    }
}
実行時パーミッション要求用のスクリプト
csharp
using UnityEngine;
using UnityEngine.Android;

public class PassthroughCameraPermissions : MonoBehaviour
{
    void Start()
    {
        // 1) すでにユーザーが CAMERA を許可していない場合はリクエスト
        if (!Permission.HasUserAuthorizedPermission(Permission.Camera))
        {
            Permission.RequestUserPermission(Permission.Camera);
        }

        // 2) HEADSET_CAMERA も同様にチェック&リクエスト
        //    Unity の Permission クラスにはデフォルト定数がないので、文字列で指定
        string HEADSET_CAMERA = "horizonos.permission.HEADSET_CAMERA";
        if (!Permission.HasUserAuthorizedPermission(HEADSET_CAMERA))
        {
            Permission.RequestUserPermission(HEADSET_CAMERA);
        }

        // このスクリプトの後に、WebCamTexture 等でカメラアクセスすればOKです
    }
}
Androidマニフェスト
csharp
<?xml version="1.0" encoding="utf-8"?>
<manifest
    xmlns:android="http://schemas.android.com/apk/res/android"
    xmlns:tools="http://schemas.android.com/tools"
    android:installLocation="auto">

	<application
        android:label="@string/app_name"
        android:icon="@mipmap/app_icon"
        android:allowBackup="false">

		<activity
            android:theme="@android:style/Theme.NoTitleBar.Fullscreen"
            android:name="com.unity3d.player.UnityPlayerActivity"
            android:exported="true">

			<intent-filter>
				<action android:name="android.intent.action.MAIN" />
				<category android:name="android.intent.category.LAUNCHER" />
				<category android:name="com.oculus.intent.category.VR" />
			</intent-filter>

			<meta-data android:name="unityplayer.UnityActivity" android:value="true" />
			<meta-data android:name="com.oculus.vr.focusaware" android:value="true" />
		</activity>

		<meta-data android:name="com.oculus.ossplash.background" android:value="passthrough-contextual" />
		<meta-data android:name="com.oculus.telemetry.project_guid" android:value="e2b65b13-e27a-4e26-90c9-3f270a1a6aac" />
		<meta-data android:name="com.oculus.supportedDevices"
                   android:value="quest3|quest3s"
                   tools:replace="android:value" />
	</application>

	<uses-feature
        android:name="android.hardware.vr.headtracking"
        android:version="1"
        android:required="true" />

	<uses-feature
        android:name="com.oculus.feature.PASSTHROUGH"
        android:required="true" />

	<!-- ★★★ カメラ関連のパーミッション ★★★ -->
	<uses-permission android:name="android.permission.CAMERA" />
	<uses-permission android:name="horizonos.permission.HEADSET_CAMERA" />

	<uses-permission android:name="com.oculus.permission.USE_ANCHOR_API" />
	<uses-permission android:name="com.oculus.permission.USE_SCENE" />
</manifest>
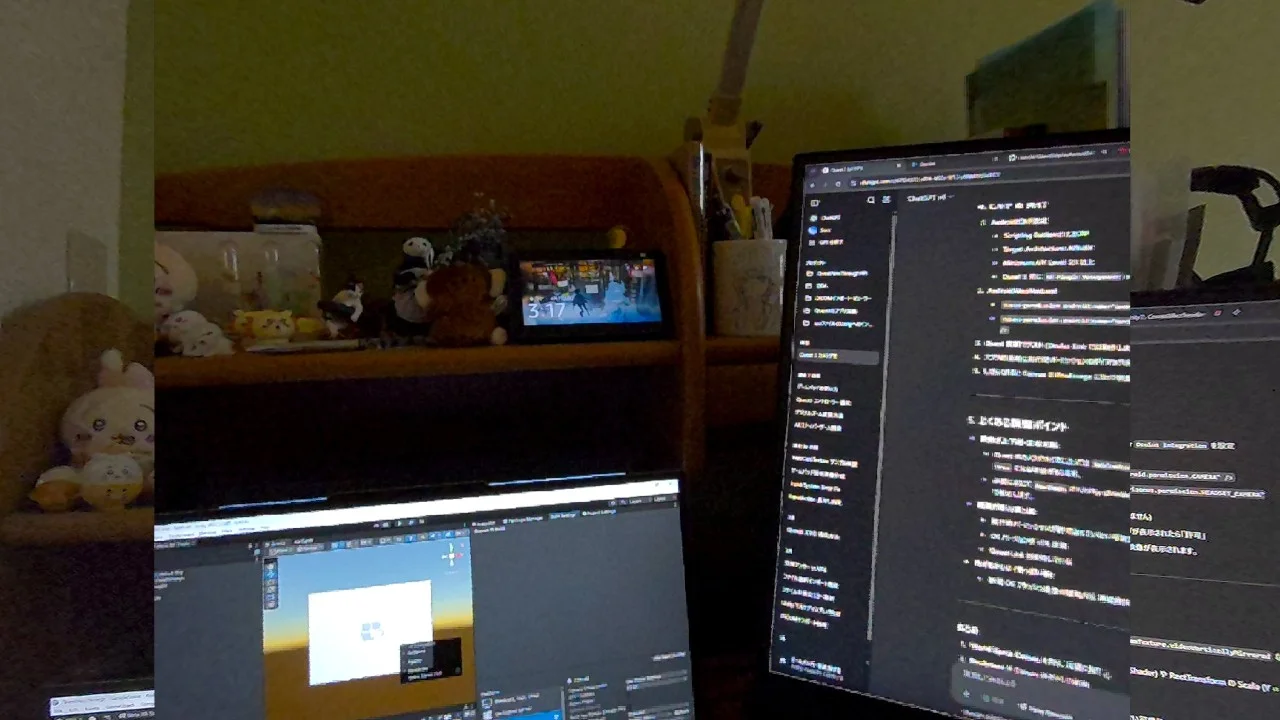
少しわかりにくいですが、真ん中に1280960のサイズの拡大されている画面があります。 (Questのスクリーンショットのサイズが1280720なのでそのままの解像度で見せることができていません)
Quest3の場合、デフォルト(メインプログラム:string cameraName = devices[0].name;)のときは左のカメラの映像を取得することができます。
右カメラの映像にしたいときは string cameraName = devices[1].name; とすることで実装できます。
総評
1からの開発に関しては圧倒的にQuestパススルーAPIのほうが簡単。 Manifestをに少し指定されたコードを追加すれば動く。 画質に関しては、そこまでよくない感じがする。1280*960というHDの中でも低い解像度を作製したアプリでは35インチ以上のモニターで見ている感覚になる。
デフォルトでは左カメラ(利用者からみて)の映像を取得することができる。
Author: 水上 | Source:
水上\QuestパススルーAPI 1c5aba435ee780e48db8dbaf3d900dd9.md